building and booting my own kernel on arch linux
this is the final output you'd see if you follow this entire blog post.
is there any linux user who hasn't dreamed of building and booting their own kernel at least once? i know i have. recently, i decided to take the plunge and document my journey of building and booting my own custom linux kernel on arch linux. here's how it went.
one of the other motivations behind this was to gain a deeper understanding of how the linux kernel works and how to customize it from the kernel level (not to ignore there wasn't a similar blog i found documenting this exact process with a good explaination, so i wanted to fill that gap too!).
disclaimer: well, this post has been paraphrased or added more context using ai.
installing all the tools and necessary packages
well, the first thing you should do is update your system and install the necessary packages. on arch, you can do this using pacman:
sudo pacman -Syu
sudo pacman -S base-devel bc flex bison openssl zstd elfutils cpio qemu-full busybox
what each package does:
base-devel: essential development tools like gcc, make, etc.bcandflex/bison: used for building the kernel and handling configurations.openssl: for signing modules.zstd: for compression.elfutils: tools for inspecting ELF binaries (kernel + modules).cpio: this is the tool we’ll use to pack the initramfs.qemu-full: full QEMU, lets us run kernels in a VM without bricking our laptop.busybox: a single binary that acts like multiple core Unix commands.
cloning the linux kernel source code
next, we need to get the linux kernel source code. you can clone it from the official linux kernel git reposiory or from github. i will recommend not cloning from github as it is slow because of the large size of the linux kernel repo and the way it handles large files. instead, use the offical kernel repo:
mkdir -p ~/src
cd ~/src
git clone https://git.kernel.org/pub/scm/linux/kernel/git/torvalds/linux.git
cd linux
configuring the kernel
this is something that every tutorial will tell you to do, but now explain it at all. the kernel configuration is basically a set of options that determine what features and drivers will be included. you can start with the default configuration for your architecture and then customize it.
to start with the default configuration, run:
make defconfig
you can customize with:
make menuconfig
you'd be wondering, why did we run the make defconfig first? make defconfig creates a default configuration file named .config file in the kernel source directory. this file is essential for the kernel build process as it contains all the configuration options that determine which features, drivers, and modules will be included in the compiled kernel. just a fun fact that kernel config has ~15000 options. for example, you can enable/disable support for specific filesystems, hardware drivers, networking fetures, and more. the build command (make) reads this .config file to know what to include in the final kernel binary. you can even turn off compilation of certain features/drivers by disabling them in the config file, which can help reduce the kernel size and improve performance for specific use cases.
building the kernel
this builds the vmlinuz (bzImage) file:
make -j$(nproc)
this command will start building the kernel using all available CPU cores to speed up the process.
-
make: starts the kernel build system -
-j$(nproc): uses all CPU cores to speed up the build. your cpu usage will spike to 100% during this process. to avoid that, limit the number of jobs, e.g.,-j4for 4 cores.
output ends with:
Kernel: arch/x86/boot/bzImage is ready
this file is the actual bootable kernel.
building an initrd with busybox
now if you are anything like me, you would want to boot this kernel and see it in action, but if you do that right now, you will get kernel panic. why?
a kernel cannot boot without a root filesystem. if you start the kernel without a root filesystem, it will panic. so we need to create a minimal initrd (initial ramdisk) that contains busybox (appreciation for it and how great it is later).
to make a filesystem for the initrd, create a directory structure like this:
mkdir ~/initrd
cd ~/initrd
mkdir -p bin sbin etc proc sys usr/bin usr/sbin dev
why to make all these directories?
linux expects /bin, /proc, /sys, /dev inside rootfs.
more on file system structure
if you are just trying to boot the kernel, and are not interested in learning about linux filesystem structure, you can skip this section.
copy busybox binary
by default when you install busybox, it installs symlinks for all the commands it provides. we can copy the busybox binary to our initrd and create symlinks for the commands we want to use.
cp /usr/bin/busybox bin/
cd bin
create symlinks for common commands
for i in $(./busybox --list); do ln -s busybox $i; done
when doing this, you will see the warning, ln: failed to create symbolic link 'busybox': File exists. you can ignore this warning. this comes because the link creation loop tries to recreate the ‘busybox’ symlink but it already exists.
create an init script
return to initrd root:
cd ~/initrd
create an init file.
cat > init << 'EOF'
#!/bin/sh
echo "booted into dharmik's custom linux kernel!"

mount -t proc none /proc
mount -t sysfs none /sys

exec /bin/sh
EOF
if wanted, instead of the script above, you can have a pretty ascii art welcome message. here's a tool to generate ascii art: patorjk.com/software/taag
make it executable:
chmod +x init
why we made this file? the kernel runs /init immediately after boot. this is your "userspace". busybox provides /bin/sh.
packing the initrd
now we need to pack the initrd into a cpio archive and compress it. from inside the ~/initrd directory, run:
find . -print0 | cpio --null -ov --format=newc | gzip -9 > ../initrd.img
or
find . -print0 | cpio --null -ov --format=newc > ../initrd.cpio
cd ..
zstd initrd.cpio
this will create a compressed initrd image at ~/initrd.img or ~/iinitrd.cpio.zst.
booting the kernel with qemu
now we have everything we need to boot our custom kernel. we will use qemu to boot the kernel with the initrd we created.
qemu-system-x86_64 \
    -kernel /path/to/linux/arch/x86/boot/bzImage \
    -initrd /path/to/initrd.img \
    -append "console=ttyS0 rdinit=/init" \
    -nographic
kernel: boot this kernel image.initrd: load your initrd filesystem.append: kernel command line parameters.console=ttyS0: print everything on serial port.rdinit=/init: tell kernel to run /init from initrd.nographic: run QEMU in terminal (no GUI).
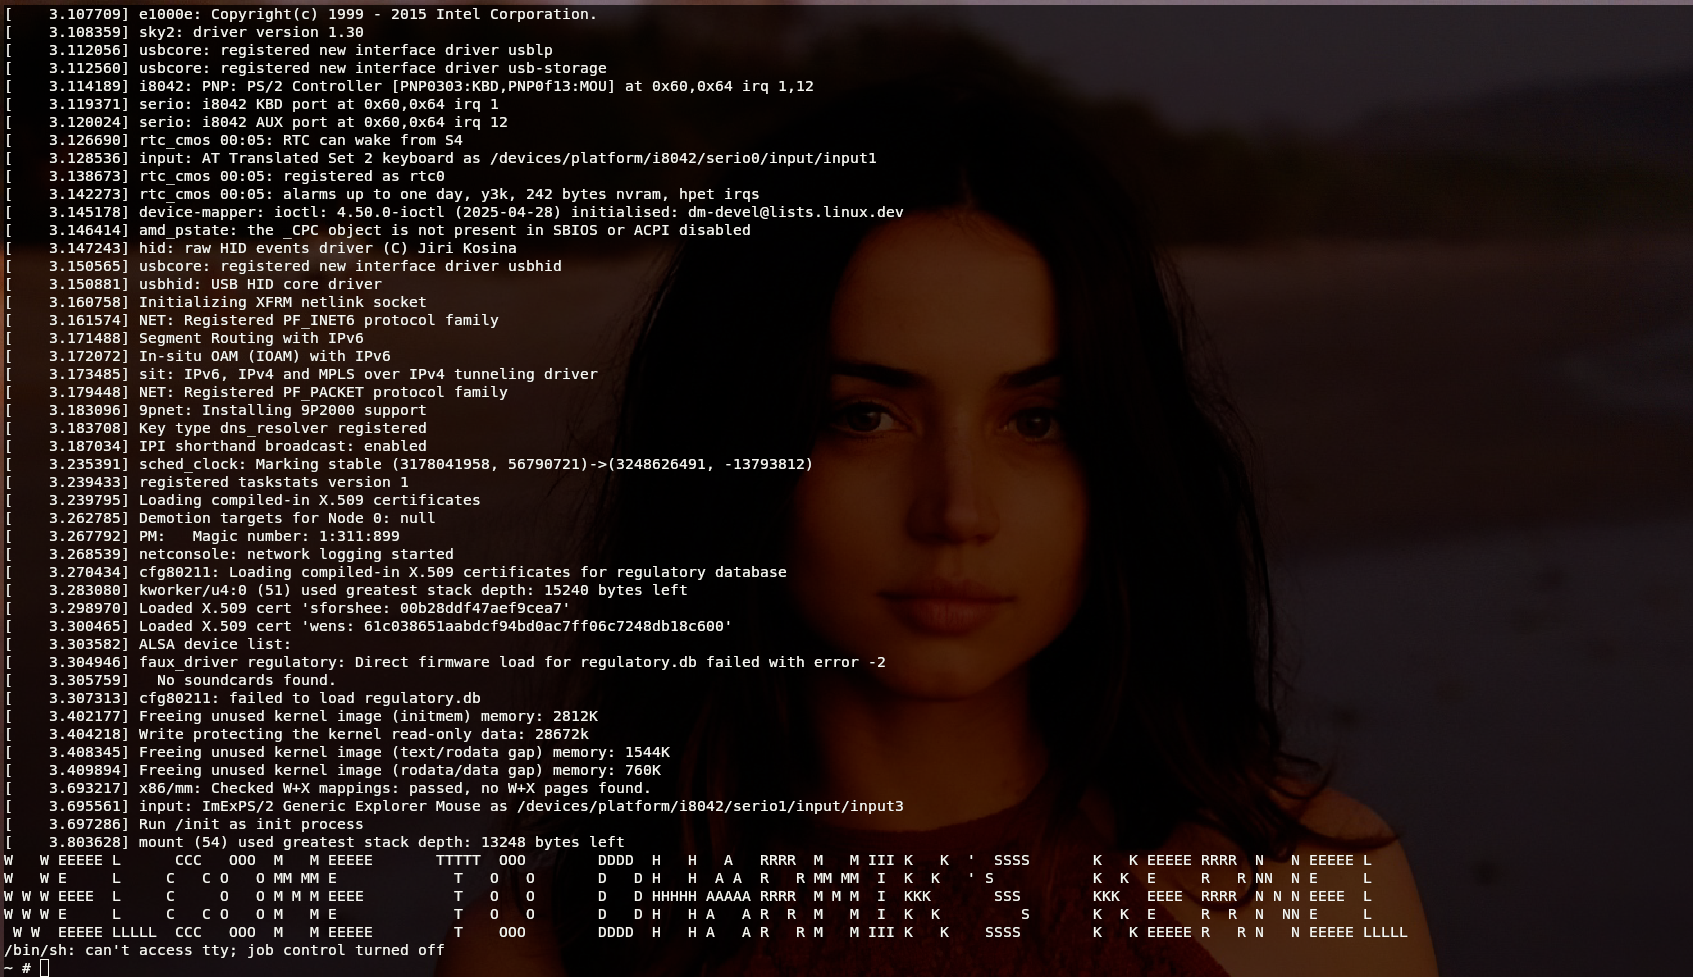
if everything goes well, you should see the message from your init script:
booted into dharmik's custom linux kernel!
this message confirms that your custom kernel has booted successfully with your initrd.
you will also see a warning like this:
/bin/sh: can't access tty; job control turned off
this is because we have not yet mounted /dev/tty. you can ignore this warning for now. right now, it's just busybox's shell directly running on top of the kernel without any terminal support.